
Return to Mirror World
PART I | PART II | Plot Notes
In August of 2005, the Neopets Hive ran a sequel plot to our 2004 "Mirror World Mystery". Known as "Return to Mirror World," this plot was three times as long and at least twice as difficult as its predecessor. In order to help you better understand how the plot progressed we've created this guide. Hopefully this will help you understand how plots on the Neopets Hive generally work, and may even help you out during future Neopets plots.
Prelude

About a month before the "Return to Mirror World" plot started, strange things started happening to Neopia. First Faerieland was replaced by a giant purple cloud, then Fyora was found zombified! Not too long afterwards, both the Soup Faerie and the Snow Faerie became sick, the Space Faerie was turned to stone, and poor Jhuidah was shrunken and, once again, trapped in a fish bowl! That wasn't all, though. In time, the Haunted Woods, the Virtupets Space Station, Maraqua, and the inside of the Darigan Citadel also became off-limits to visitors. Meanwhile, King Hagan, King Skarl, King Kelpbeard, and King Coltzan where nowhere to be found...
Mission One:

Save Jhuidah!
To start the plot off simple, Mission One's objective was to find a way to make Jhuidah normal-size again. Those who remember when this last happened to her during the "Mystery Island Volcano Plot" knew that a Tagobo Potion was the only thing that could accomplish this. By going to the Tropical Food Shop and adding "tagobopotion" to the address, you were essentially asking the shopkeeper if he had a Tagobo Potion. Here is the resulting link:
http://www.neopetshive.com/Hive/shop20_tagobopotion.htm
By clicking on the Tagobo Potion, you'd be brought back to the restored Jhuidah.
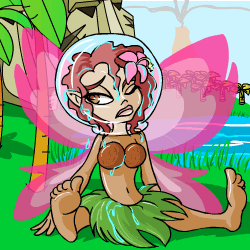
Ugggh, my hair!
I sincerely hope this is the last time someone around here shrinks me! Oh well, you've probably got your work cut out for you. Here's what I know... Jhudora is definitely behind this years attacks, but she's not alone. She's got a great deal of help. I can only imagine what kind of weapons and items they're creating with my cooking pot, but the joke's on them... without my magic, and that of Pango Pango, it's useless to them.
I owe you dearly for saving me, so I'll tell you what, if you need my help again, come see me HERE. I might be able to mix something up for you in case you need it later.
Now, if I were you, I'd go have a word with Illusen. She might have found something new for you.
By completing this mission, two things happen. First you are given a link to the Cooking Pot in case you need it later, and second, you are sent back to Illusen for further instructions.
Mission Two:

Save Coltzan, Hagan, Skarl, and Taelia!
Illusen's instructions at the end of Mission One indicate that you should go to Kayla and use Illusen's name. If you do go to Kayla and use "illusen" as a passcode, just like you did with the Tagobo Potion on Mystery Island, you'll be brought to a special page where Kayla explains that King Skarl has her last vial of Zombie Remedy. This gives you two important pieces of info. First, you need to find Skarl. Second, when you do find Skarl, you need to ask him for his vial of Zombie Remedy.
At this point, most people searched Mirror World high and low for Skarl, but little did they realize that he, along with his brother, was trapped in the Darigan Citadel. So, how are you supposed to gain access? Good question. Somebody somewhere has to know, but who and where? At this point, there really was nothing else to do but snoop around and hope you came across something useful. Most people found themselves in the Lost Desert, where playing cards were not-so-randomly appearing in various locations. But what did they mean?
Referring to last year's "Mirror World Mystery" plot, visitors would have learned that the secret code in Sutek's Tomb could be broken using the playing cards.
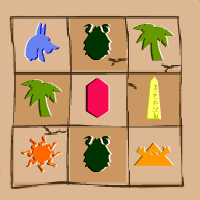
So, now all you need to do is find a card for each symbol and you can get into the tomb, right? Right. Just like last year, Anubits, a character from Neoquest II, could be found in the Palace by using the passcode "coltzan". The scarab represented "Swarm!", the Palm Tree represented a single tree in the Lost Desert, the ruby represented the gem in the forehead of the Sphinx, the sun represented the potentially solar-powered calculator, and the pyramid represented the game "Pyramids." Applying the cards correctly to this puzzle, you would end up with this code: ak441026k9.
Entering this code into Sutek's Tomb would bring you to yet another puzzle. Now ordinarily, the ghost of King Coltzan guards Sutek's Tomb in Mirror World when there is no plot going on. Now, however, a bizarre Word Pyramid game awaited anyone who succeeded in breaking Sutek's code. So, the next question became, "How do I solve this puzzle?" Well, perhaps Coltzan knows.
Even if you had no idea that Coltzan was in the tomb ordinarily, eventually you would have realized that there was no underscore (this thing: _ ) at the end of the address, so the puzzle wasn't there to be solved. Searching around Neopia would have ideally brought you to the Island Mystic, whose latest fortune was "There's treasure in them there ruins!" Well, there are only two ruins in Neopia: the Ruins of Maraqua and the newly discovered Deserted Ruins in the Lost City of Geraptiku, on Mystery Island. Entering the Ruins, one should notice that the address ends in "_0.htm". By patiently working through the 50 possible outcomes inside the ruins, one would sooner or later come across the correct passage which contained a golden statue of King Coltzan. (Originally, the Golden Statue didn't have a passcode, but one was later added for use during PART II.) In order to confuse participants and prevent cheating, the passage which held the treasure was changed regularly.
Clicking on the image of the Golden Statue would bring you to a page with the Ghost of King Coltzan.
Thanks! I owe you one!
I've been trapped in that statue for some time. I know everyone thinks that Jhudora is responsible for what has been happening, but she's not working alone. Lord Kass is back somehow, and he was the one who imprisoned me in that statue. He had begun work on a puzzle inside of Sutek's Tomb... I remember that, just before he discovered my presence, he was inscribing several names into the puzzle, but one just didn't seem to fit with the rest... he seemed very upset when he noticed me watching, so whatever he was doing, it must've been very important to him.
You'd better get back to the Lost Desert and see if you can figure out that puzzle, and what the purpose of that name on it is.
Coltzan's testimony gives you a few good pieces of info. First, Jhudora's not working alone. Second, Lord Kass is involved. Third, the puzzle in Sutek's Tomb has names hidden in it, one of which didn't fit in with the others. Returning to the puzzle, one could quickly find "DARIGAN" and "KASS", as well as the word "EVIL". Evil was meant as a clue to search the Gallery of Evil for other possible characters, such as Masila, an Acara from the "Hannah and the Ice Caves" plot. Since Kass was the one who inscribed the names, it was pretty safe to assume that this passcode could be used to get past the Darigan Elementals which guarded the Citadel. Once inside, King Hagan and King Skarl could be immediately found and rescued from the dungeons.
By clicking on each king, you are brought to a new location with a special address. For Skarl, the sole purpose of this address is to get the Zombie Remedy from him. So, by using "zombieremedy" as a passcode, you can convince the very grumpy old king to help you. The image of the Zombie Remedy comes with its own passcode, "MAGIC ZOMBIE INJECTION", as well as instructions to take it to the pharmacy. Going to the pharmacy and using the passcode will result in you receiving a special injection which also has a passcode, "MAGIC INJECTION.' Using "magicinjection" as a passcode while visiting Taelia would allow you to complete Mission Two and receive a prize from her which would come in VERY handy during PART II, a Snow Faerie Token.
If you go to Illusen with the passcode from the Token, she'll congratulate you on a job well done and give you instructions for Mission Three.
Mission Three:
Save the Soup Faerie!
During Mission Two, King Hagan was among those you saved. It mentions on the page he gives you special access to that he knows quite a bit about the various characters in Mirror World. In actuality, he knows about precisely 21 different characters, some being more integral to the plot than others. If you went back and asked him about the Soup Faerie (passcode: soupfaerie), he'd mention Soup Faerie Mushrooms.
Last year during the "Mirror World Mystery" plot, if one wanted to know about the Gnome Shroom required to complete a quest, they could ask two people: Kayla and the Rubbish Dumpkeeper. Using "soupshroom" as a passcode, Kayla would tell you that they grow near Meri Acres Farm. Using the same passcode at the Rubbish Dump would yield your prize, a magical Soup Faerie Mushroom with a description which indicates that the shroom could be used to make a medicinal soup. Well, Jhuidah still owes you a favor for saving her, so why not bring it to her? By using the passcode from the Soup Faerie Mushroom at the new address of the Cooking Pot, you would receive a bowl of Enchanted Mushroom Soup. Take the passcode from this item to the Soup Faerie to heal her and receive yet another token.
If you visit Illusen with the passcodes from BOTH tokens, you'll find that all is not well in Illusen's Glade...
For completing PART I, all participants received a special Token from Illusen.
Mission Four:
The Bonus Quest!
While traveling around Mirror World during PART I on the plot, most participants came across a very mysterious item at the jelly volcanoes in Jelly World: a Fire Faerie Mushroom. But this wasn't just any Fire Faerie Mushroom, this was a Central Fire Shroom.
Once again, a trip to Kayla and the Rubbish Dumpkeeper would come in handy here, as both characters will tell you that Fire Faerie Mushrooms are very rare, and only grow near volcanoes. Well, aside from the one in Jelly World, there are two other volcanoes on Mirror Neopia... the hidden one to the north of the Tyrannian Plateau and the currently dormant one in the middle of Mystery Island.
In Tyrannia, visitors need a special passcode from the Town Hall in order to visit the Volcano. It is extremely dangerous, after all. That passcode allows you to speak with Eithne, who will give you a Northern Fire Shroom if you ask her nicely.
Meanwhile, on Mystery Island, a trip to the Codestone Redemption Center would be prudent if one wishes to receive the third and final Fire Faerie Mushroom, the Southern Fire Shroom.
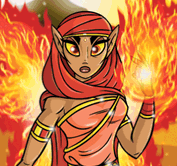
Now... who would want all of these? Well, as was mentioned, this "bonus quest" was actually intended to be a hidden quest during PART II, but was added to PART I prior to its release. By PART II, participants were probably well aware that their goal would be to procure more Faerie Tokens to help them save Fyora, or something along those lines. So, since there were all these Fire Faerie Mushrooms being plucked from three of the four corners of the mirror world, it's a pretty safe assumption that whoever the quest-giver was, it was most likely a Fire Faerie. Well, there are only four possible options here: a Bottled Fire Faerie (unrealistic), an Uber-Fire Faerie (possible, but they only like clothes), Eithne (she GIVES you a mushroom) and Nuria, a new Fire Faerie from the "Lost Desert" Neopets TCG Expansion Set. Venturing back to the Lost Desert and into the palace with the passcode "nuria" would grant you access to this secret quest which, quite ironically, was already completed by most people prior to ever receiving it!
For bringing Nuria her three Fire Faerie Mushrooms, participants received a Fire Faerie Token... their collection was now half-way complete...
PART I | PART II | Plot Notes